
Online bar nesting · steel, aluminum, wood, PVC
Tube and profile nesting software — 1D cutting with angled cuts.
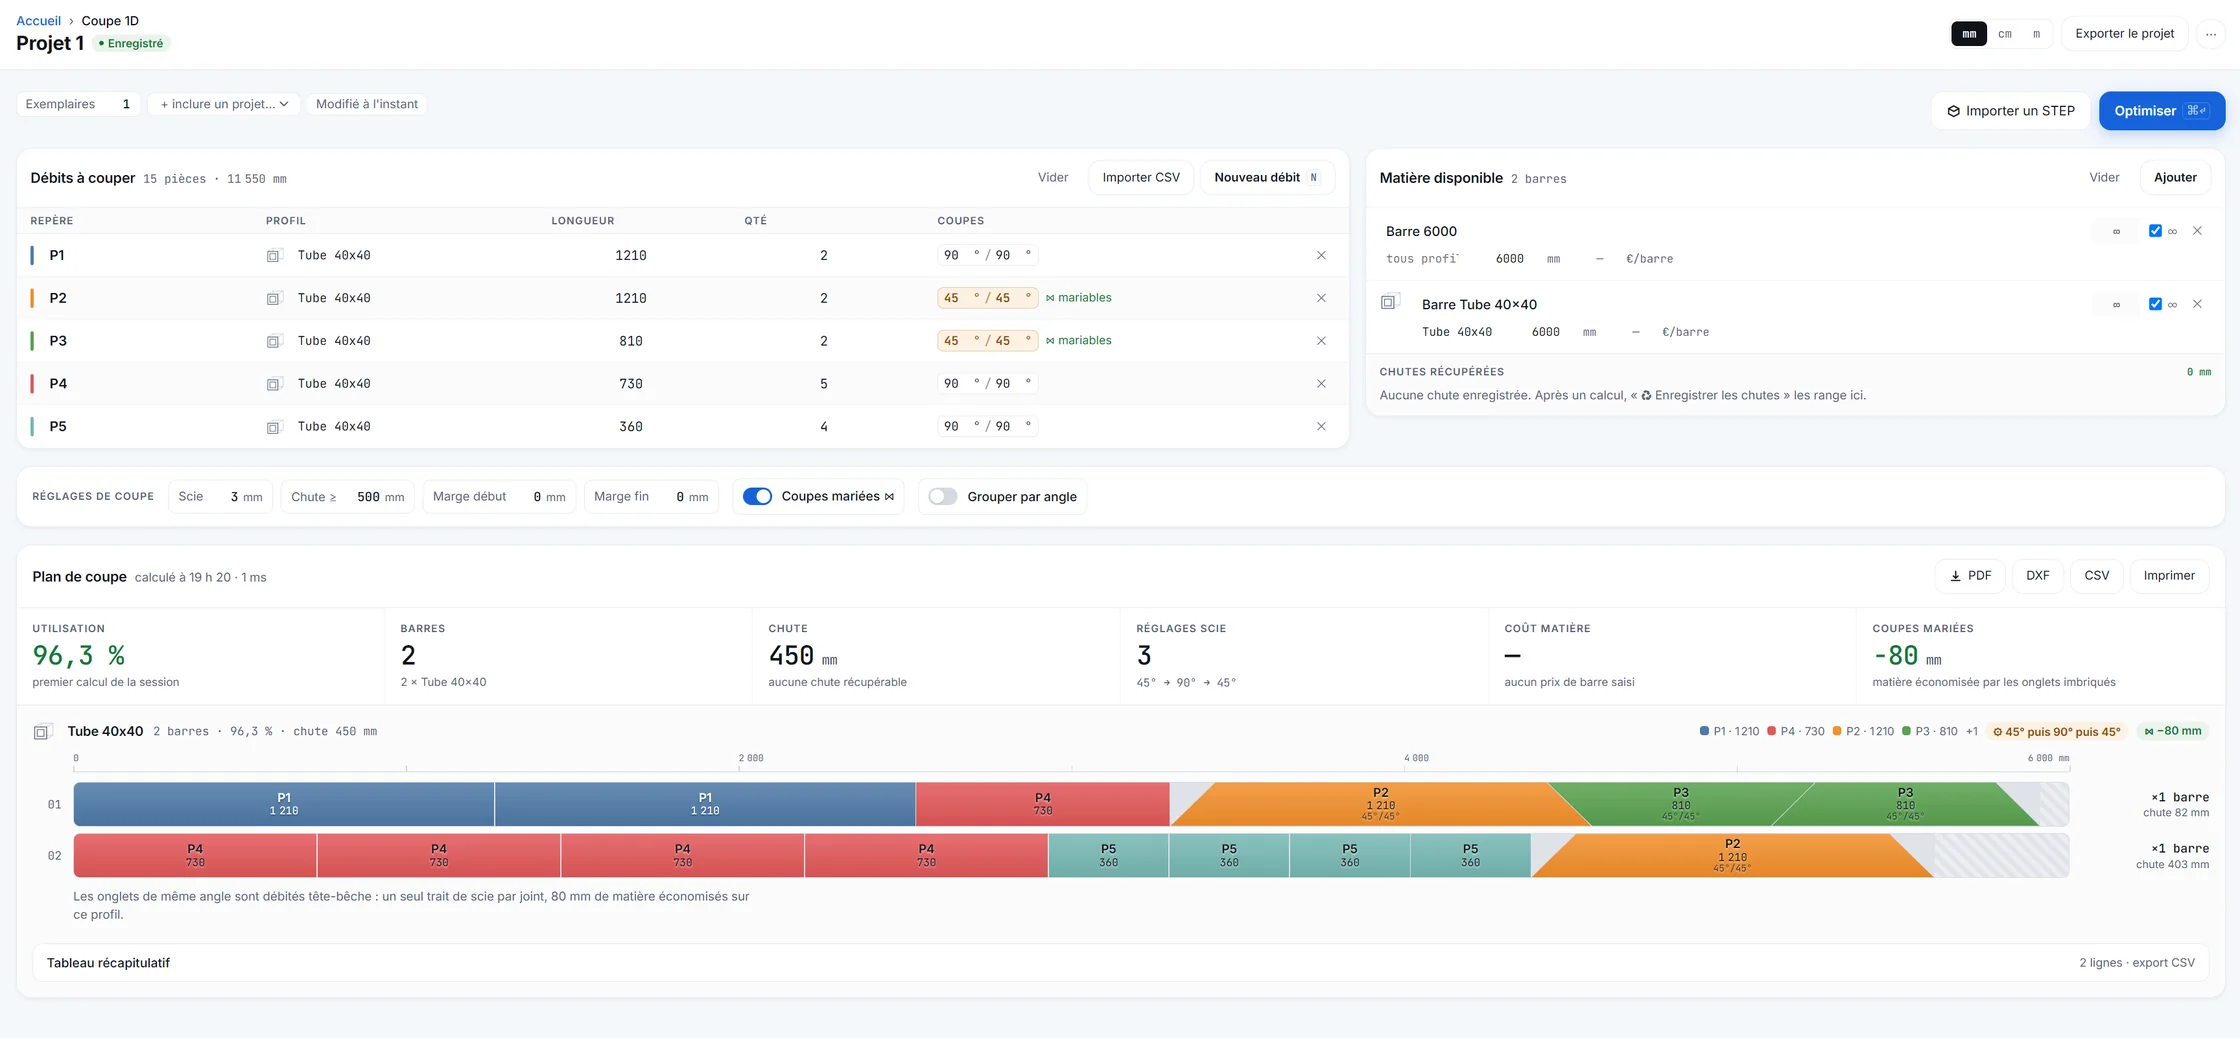
Your cut list becomes a bar-by-bar cutting plan: the Paired miter cuts that share a saw kerf, saw angle changes kept to a minimum, offcuts long enough to be reused pulled aside. No software to install, no account required.
What tube nesting solves for metal fabrication.
You have a list of parts to cut — thirty lengths of 40×40 square tube, each with its two cut angles — and a stock of 6 m bars. The cutting plan question is: which parts to group into which bars so as to throw away as little material as possible ? Put that way, it is a 1D optimization problem — sometimes called 1D nesting or 1D cut layout — and in the workshop it is what decides how many bars end up in scrap and how many times the operator has to change the saw angle.
Done by hand on a spreadsheet, it works for five parts. Beyond that, material is always left on the table — not out of carelessness, but because a human brain cannot enumerate combinations fast enough to prove it is holding the best one. A bar nesting software compares them.
What Cut to Fab does
Tube cutting optimization: four decisions the software takes.
Paired miter cuts ⋈
Two consecutive miter cuts share the same saw kerf: the end of the previous part and the start of the next are cut in a single pass. On a run of assemblies welded at 45°, that puts 3 to 8 % of the material back onto the plan.
Angle changes kept to a minimum
Every swing of the saw from one angle to another is time on the clock: the sort groups cuts by angle, at equal material-loss rates. It is not the primary criterion (we do not sacrifice 1 % of material to save three settings), but when solutions tie, it breaks the tie.
Reusable offcuts pulled out
Any offcut above a threshold you set (300 mm for example) is tagged as reusable and pulled out separately on the plan. On the Pro plan, an offcut inventory keeps these lengths and feeds them back into the next calculation — the next run starts by drawing first from what is left.
Saw kerf included in the calculation
Your machine’s saw kerf (typically 2 to 4 mm) is adjustable per project. It is deducted at every cut and shown on the plan: no bad surprise in the workshop because a piece of software reasoned in mathematical lengths.
What it looks like
A cutting plan the workshop can read.
Each bar is drawn to scale, cut by cut, with the part marks to write with a marker. The PDF prints, the CSV goes into the ERP, the DXF drives the machine. The same plan fits on one A4 sheet for the operator.
In action
Cut to Fab turning a STEP file into a cutting plan.
From STEP import to a printable cutting plan in a few minutes: profile recognition, cut list, miter-paired cuts and reusable offcuts.
What comes in, what comes out.
As input, two ways: either a cut list entered directly (length, left angle, right angle, quantity, reference, material), or a STEP dropped into the application — profiles are recognized, measured, and the cut list comes out without re-entry. This second route needs a connection; the first runs entirely in your browser.
As output, four formats — because no one in the workshop works with just one:
- PDF — the cutting plan for the operator, to print and put on the bench.
- CSV — the list of cut parts and bars used, to import into an ERP or stock management.
- DXF — the outline of the parts, to drive a CNC machine directly.
- JSON — the full project, to re-open later or archive. Open, documented format: no closed format is holding you.
Bar nesting in Excel
Replacing your Excel bar nesting spreadsheet.
Many workshops keep their bar nesting in an Excel workbook: a column of lengths, a total per bar, and the eye of whoever lays out the parts. That holds up as long as the cuts are straight and the parts are few. Once there are miters, offcuts to reuse and some thirty cut parts, the spreadsheet does the sums; finding the layout is still up to you.
No need to retype the list: save your sheet as CSV from Excel or LibreOffice, then import it into Cut to Fab. The software reads the part mark, profile, length, quantity and angles; it accepts comma, semicolon and tab separators, decimal commas included, and flags any lines it could not read.
On the way back, nothing forces you out of the spreadsheet: the CSV export of the cutting plan — bars, cut parts, angles and offcuts — opens in Excel, for your order tracking or stock management. Exports require a verified account, which is free.
Frequently asked questions on tube nesting
What we get asked before people try.
Does the software handle miter cuts?
Yes: each cut part has an independent left and right angle, entered in degrees (protractor built into the field). The solver recognizes compatible miter pairs and pairs them — two complementary cuts then share the same saw kerf.
Can I choose my bar length?
Yes. You enter the bar length your supplier delivers — 6 m is the default, but nothing forces it. You can also declare several length tiers (for example 6 m and 8 m), and the solver chooses which to use for each group of cut parts.
Can I reuse offcuts from one job to the next?
Yes, on the Pro or Workshop plans. Offcuts above a threshold you set (typically 300 mm) are automatically saved to an inventory, with their profile and their length. On the next calculation, the software starts by drawing from it before starting a fresh bar. The Free plan shows reusable offcuts on the cutting plan, but does not remember them from one session to the next.
Is the saw kerf taken into account?
Yes, and it is adjustable per project — the same cut list can produce a different plan on a 2 mm-kerf saw and on a 4 mm-kerf one. The default is 3 mm, to adjust to your blade.
How many cut parts per calculation?
Without an account, the Free plan accepts 30 cut parts per calculation — enough for a small real job, not enough for a production run. With a verified account, also free, it moves up to 50 cut parts per project. On Pro and Workshop, there is no cap. The other limits (number of projects, watermark on exports) are detailed on the pricing.
What is tube and bar nesting?
Bar nesting — sometimes called 1D nesting or 1D cut layout — is the task of fitting a cut list (tubes, profiles, angles, battens) into standard-length stock bars while throwing away as little material as possible. In practice, it decides which parts to group into which bars, in what order to cut them, and how to pair consecutive miter cuts so they share the same saw kerf. Cut to Fab does this automatically from your cut list or from a STEP file.
Is Cut to Fab a tool for the workshop or for the design office?
Both, at a specific point in the flow: between the design office and the workshop. The design office hands over a STEP file or a cut list; the workshop gets back a printable cutting plan, a CSV for the ERP and a DXF for the machine. Cut to Fab replaces neither the design office’s CAD nor the workshop’s habits: it does the translation between the two, which today is often done by hand on a spreadsheet.
Does Cut to Fab replace an ERP or a stock management software?
No. Cut to Fab produces a cutting plan and a list of consumed bars exportable as CSV — that list feeds your existing ERP or stock management system. The reusable offcut inventory (Pro and Workshop plans) is kept by Cut to Fab, because it is cut-specific and of no interest to a general-purpose ERP. No double entry is required: the CSV imports directly.
In the same software
What else Cut to Fab does.
STEP analysis
The profiles of an assembly recognized and measured, with nothing to retype.
Sheet metal unfolding
The dimensioned flat blank, with its bend lines, as a DXF for cutting.
Comparison
What general-purpose cutting tools do not do: angles, paired miters, offcuts, STEP.
Open the workshop and drop in your first list.
The Free plan runs without an account. You see the cutting plan for your first list in under a minute; if the calculation does not convince you, you close the tab.